Showing posts with label Painting. Show all posts

Friday, May 24, 2013

Hobby: Care and Feeding Your Paint Brushes


Of all of the tools we use, the most important are our paint brushes. As you get more into painting you’ll want to invest in good brushes. I use Winsor & Newton Series 7 brushes while Goatboy uses Raphael Series 8404 brushes. Most of us buy these on the Internet at a discount but they still represent a decent investment in our tools. As with any tool proper care will ensure a long life with lots of use.

At the end of any painting session you’ll want to give your brush a thorough cleaning with clean water and brush soap. The brush soap I recommend for regular cleaning is the Masters Brush Soap. This soap comes as a cake of soap in a plastic container. The nice thing about this soap is that it quickly removes the light pigments that build up in the bristles as you paint. It always surprises me how much color this soap removes from the brush even after I think I’ve completely rinsed the brush out.


Over time small amounts of paint will find its way up into the ferrule of you brush. These little deposits will hinder your brush from maintaining a decent point. When your brush has reached this point you can resurrect the point. Winsor & Newton Brush Cleaner and Restorer is the tool for this job.

There are brush rinsing pots for soaking your brushes in but pay for something that is easy to make? All you need is two bamboo skewers, a pill bottle, and some poster tack. Now once you set up your rig add the brush cleaner to go above the ferule. From here on out just follow the directions on the bottle of Brush Cleaner, and your brush will be back in pro form in no time.


How do you keep your brushes in top form?
Continue Reading...

Tuesday, July 17, 2012

Back in the saddle


For your Viewing Pleasure A new hobby video:


As always leave your thoughts in the comments.
Continue Reading...

Thursday, March 17, 2011

Hobby: Buying an Airbrush Setup

Today lets talk about buyin and setting up your first airbrush.  My first foray into the world of airbrushing was 12 years ago...
Continue Reading...

Wednesday, January 5, 2011

40k Hobby: Yme –Loc Paint Scheme

During the Holidays I took some time to paint up a couple of test models for the Yme-Loc army that was sent to The Girl. The first note I will make is that I used a wet palette to paint with. Wet palette allows me to get the most out of my paints. The second important note is that I almost exclusively use Reaper paint products. Reaper makes a line or paints that I really like and they work beautifully with a wet palette. What I'm going to do is list the paints I used in painting the models, and I will give rough Vallejo Game Color Equivalents because they just work out better.
Continue Reading...

Monday, January 3, 2011

The Road Ahead 2011

When it comes to those of us who live in Austin, TX I am more the hobby guru. Not that this is a bad thing, but being more about all things hobby tends to hurt my game. Does this bother me? Not particularly but it reminds me where my priorities should be. Before I talk about my course for the coming year I always like to see where I have been.

Continue Reading...

Wednesday, June 2, 2010

HOBBY: The Word on Seal Coats pt. 2

If you have not read part 1 do that now. This time around we will discuss paint on sealers.
Continue Reading...

Thursday, March 25, 2010

Hobby: The Word on Seal Coats pt. 1

I have received multiple requests asking me to write about sealing a miniature once it’s painted. Before you read this article please be sure to read both articles I have written on primer: “Primer on Primer” and “Q & A on Primer.” Many of the concepts I address in those articles apply to seal coats. As a note sealer and varnish are used interchangeably.
Continue Reading...

Tuesday, March 23, 2010

Hobby: Yellow like a Submarine

The color yellow is the bane to many a figure painter, but it doesn’t have to be. Before we dive into this subject let’s talk paint and what it is made of. Paint has three parts: binder, vehicle, and pigment. Binder is what keeps the other two parts of the paint together. Too little binder and the emulsion that is paint will fall apart. Vehicle is what the pigment is suspended in and contains resins, proteins, plastics, etc. in a liquid form. Pigment is the color.
Continue Reading...

Tuesday, February 23, 2010

Hobby: Q & A on Primer


Recently a friend of mine asked some questions about primer. His questions elicited responses that I did not cover in my original Primer on Primer. The answers were more specific and he found them more helpful than my original article, so I thought I would share the questions and answers here. I grouped some of the questions together because the answers are related.
Continue Reading...

Saturday, December 26, 2009

Project Log: The Shelf of Shame


Well there it is in all of its procrastinated glory. I have even more unpainted figures for the Empire, but this is the army that I will be painting up according to the list that I drew up in my last installment. As you can see my force is in various stages of paint, from bare plastic/metal all the way up to being done.
Continue Reading...

Monday, November 30, 2009

WFB Hobby: Coming Out of Semi-Retirement


Over the last two years my tournament WFB armies have been pretty much retired. They would come out from time to time to play friends or help folks out in tuning their forces up, but I have really not had much of an interest in playing tournament games with them. Mind you some of this is due to some absolutely horrendous sportsmanship at the first WFB ‘ard Boyz. Well, Minus 67 has talked me into pulling my oldest army out of retirement, which is now 20 years old. It is the one army I own that has the best chance of being competitive in the Daemon/Vampire dominated tournament scene, and one of the few armies that consistently shows up in the top ten rankings. That army is the Empire.

My Empire army is a multi-generational army that was started on the tail end of 3rd start of 4th edition. Its main core of troops was initially built using the figures found in the GW-Milton Bradley Game called Battlemaster. Many of those figures are still in my army, and yes they are absolutely tournament legal because they were made by GW. In 6th edition my army got its first real face lift with the figures that came out with the boxed set. Then in 7th edition, after the recent army book, I got the battalion box with the new style troops.

I’m sure that by now many of you are wondering what all of this rambling is about and I assure you that I have a point. I’m going to write a series of hobby articles revolving around rehabilitating this old army for tournament play. I will also discuss some of my thought processes behind unit selection and tactics. Overall, I will be focusing more on the hobby aspect of all of this because that is what I enjoy the most, and it will give me a framework for the hobby articles I have thought about writing.

I’ve designed a preliminary army. The build had a few main goals. They were: 1. Use what I have. 2. Make something fun to play and play against. 3. Make sure it has a chance to perform well. 4. Leave room for improvement.

With that in mind I designed the following list. It is far from perfect, but it looks interesting and should put up a decent fight.


Empire Army List


Arch Lector Of Sigmar on War Altar x1 w/ Wyrmslayer Sword, Armor Metoric Iron, Van Horstman's Speculum; 295pts
3x Battle Wizard Level 2 w/ Dispel Scroll x2; 450pts
Knights Blazing Sun x10 w/Full Command, Steel Standard; 290pts
Halberdiers x30 w/ Full Command; 170pts
Spearmen x30 w/ Full Command; 170pts
Crossbowmen x20 w/ Full Command; 180pts
2x Handgunners x10 w/ Marksman, Hochland Long Rifle; 210pts
Great Cannon x3; 300pts
Mortar x1; 75pts
Hellblaster Volley Gun x1; 110pts

Total: 2250pts 134 Models 8PD/7DD

The goal with this build is for the big units to act as meat shields for the casters. The Arch Lector is for general beat down, and I think it is pretty self-evident what the shooters are for. I realize that I spammed my artillery and casters, but I think that is a small matter. My greatest strength is guessing range, and I have enjoyed a lot of success with the big guns. Nothing brings a wider smile to my face than when my opponent walks into the mouth of the Hellblaster, or when my opponent thinks my ranges are off only to find that they have been hit by three cannons and a mortar.

I will be looking at ways to add a Steam Tank into this army. I may also look at some alternative builds, but for now it looks like I have a good starting point.

In my next installment I will face my shame publicly by producing the Portrait of Shame, or as I call it, “What I should’ve finished painting ages ago.” I will examine what exactly I will need to do to get this force fully painted and on the table. I will discuss how I will plan this all out, and I will look at what will need to get its paint stripped and what can just remain as is.

All right readers your turn! Have at my build. Also let me know what major army plans you are looking at for the 2010-2011 Tournament Season.
Continue Reading...

Friday, October 23, 2009

Hobby: Vallejo Course Pumice

One of my favorite mediums for applying to the base of a figure is Vallejo Course Pumice. This stuff is pumice sand in a suspension of acrylic resin, which looks like a sandy paste. When it is dry it has a rough sandy texture to it. This stuff has some utility beyond basing, which is why I love using it so much.

I utilize this stuff just as one would use sand and PVA/white glue. The main difference is that when the pumice is dry it is much harder and I do not have the flaking problem that one may get with sand. I also have found that I can add bits pushed down into the pumice. When I do this the pumice effectively glues the bit down to the base. The reason I have moved to using this is that any gap in the slotta base is easily and quickly covered over by the pumice.

When I use the Vallejo Pumice I start by guessing at a portion I will need, and I will take out that portion from the tub and place on an old bottle cap or jar lid. I transfer what I need out of the tub so I do not prematurely dry out what is left in the tub, which is also a useful tip when working with premixed spackle.

Once I have my working stock, I begin applying the pumice to the base with an old #11 X-Acto blade. (Important safety tip: when using old hobby blades for non-cutting projects be careful because they are dull the cuts they can make to you are worse.) I start working from the inside of the base outwards, and I work with a wet blade. A wet blade is a blade that has been dipped in water, and is useful because it will smooth the surface of the pumice.

Once the pumice is applied to the entire base there are a few directions to go. The most obvious is to let the pumice dry and treat it like sand on a base. This works just fine and is most useful when painting armies. However, I like getting outside of the box and found that this pumice will hold bits on to the base like glue. What I have done is applied bits from my bits box, talus, or ballast to bases to add some visual interest.

At the beginning of this article, I wrote about the utility of this product. One of my favorite aspects about the Vallejo pumice is that it adds some actual weight to a base. It doesn’t add enough weight to counter balance off center metal models, but it works perfect for plastic figures. My other use for this product is on vehicles. I have found it works great for modeling mud build up on tracks, track guards, and tires.

There are some who will argue that sand works just as well, or that the $12(US) price tag is a bit much. However, I have based close to 4 dozen figures and still have more than half a tub left. Also when you are spending $15-$60(US) for single models the price consideration becomes negligible. Overall I like this stuff and recommend that everyone give it a try.
Before I close out this article I thought I would share a picture of my finished witch figure from my last article. Enjoy!


For those of you who have used the Vallejo Course Pumice tell us about your experience with it. Also feel free to post up your ideas with how you would use this stuff.
Continue Reading...

Wednesday, September 30, 2009

Back in Black


Up until recently I have shied away from using black as main color on my figures (my Ravenwing being the exception of course). I was dissatisfied with how black looked. It either looked overly grey or that I had made a pathetic attempt at highlighting. After a lot of internet searching and discussion with my professional painting friends, here is what I leaned.

Most of us who paint on an intermediate level understand the idea behind shadow, base color, and highlight. GW’s paints are designed to capitalize on this idea as are the figure paints of other paint companies. This subject alone can spawn pages of discussion on color theory and paint mixing. On a basic level the idea is about properly rendering color in three dimensions through using rough proportions of 25% of the painted area being a shadow tone, 50% base color, and 25% highlight. I admit those proportions are terribly scientific and not representative of a painting style. However, those proportions are helpful when thinking about painting black. Black’s shadow and base color is black, which means once you have applied a solid layer of black all you will be doing is bringing up the highlights. This can be quickly observed on any model painted by GW’s Heavy Metal painters, and is obvious on chaos warriors or marines in black power armor.

The next concept in painting black is that black isn’t really black, at least not on cloth. Black is achieved in cloth through mixing dyes. This can be most easily observed in men’s dress socks. The color of black on the sock may be brown, blue, red, green, violet, and rarely grey. This knowledge can help us paint our highlights naturally. Armed with these two concepts, we turn to color selection.

Many painters, including myself at one point, will highlight black through the additive process. This means that we start with black and build our highlights by adding white to the mix. This is an acceptable way to highlight black, but I began to notice on my figures that these grayscale highlights looked flat and lacked life. This is when I discovered the paint color “Payne’s Grey”.

This wonderful near black color can be mixed using black, blue, and a dark brown. Alternatively you can get this pre-mixed. GW’s version is Necron Abyss, which is not as near black as I would like, but could easily be made closer by adding Chaos Black to it. Reaper Miniatures makes a color called Blue Liner that I feel is spot on, and it is what I use.

I start by applying my first highlight of pure Blue Liner where I want the highlights to start and paint towards the brightest point of the highlight. After this is done I will start adding an off-white color to the mix and repeat. It is important to note that I add these highlights where the paint is thinned about 50/50 with water, and I add very little white at a time because white can quickly lighten up the color, which can spoil some of your transitions.

It is important to note that using an off-white color is preferred. I suggest this because pure white can bring up the color too fast, and make your work look chalky. If you’re using GW colors I would suggest for your off-white using Bleached Bone, Dheneb Stone, or Astranomicon Grey mixed with some Skull White. I use a set of three off-white colors from Reaper. They are Linen White, Leather White, and Ghost White. Using any of these off-white colors will produce some really great effects when used with Payne’s Gray.


The wolf that used in my opening image uses a lot of these not black concepts and when you look at it you begin to see that working outside of grayscale gives the wolf's pelt depth and yet it still looks black.


Here is an example of my work using Payne’s Grey. I utilized Ghost White on this model. I’ll admit it is far from perfect, but I do like the depth that the blue in the Payne’s Grey gives to the highlights. (This figure is far from done.)


How do you highlight black? Have you used these colors before? Tell us how these concepts work for you.

Continue Reading...

Wednesday, January 30, 2008

Painting Pointers


I realized after a few read throughs, that Atredies article was not about lazy painting, but about working smarter not harder. When one has nine pointers on how to turn out painted forces they aren’t lazy; they’re economical. The thought occurred to me that many of his pointers were the base for which advanced painting techniques come from, so I thought I would share some tips on improving your painting ability.

1. Paint often

If you paint 5 minutes or 5 hours, you must paint everyday. This simple act will improve your skills, even if you are not trying to. Painting on a daily basis will build muscle memory and fine motor skills. I find that when I go without painting it takes me some time to get back into it, so save your self the hassle.

2. Ask

I find that I have learned more from asking others more experienced than me how they accomplish various effects. Painters love telling you how they accomplished a project, so take advantage of this willingness to share.

3. Research

You should always look for new techniques. Thanks to the internet this is a fairly easy task. For example, Micron Pens have made some of my painting tasks easier, and in fact I have become faster painter because of these miraculous pens.

4. Tools

If you are really into painting figures invest in your tools. I used to think that brushes or paints were the same as any other. I must say I was truly mistaken. Cheap hobby paints are substandard when compared to figure paints and artist paints, and brushes are not all created equal. Since I’ve upgraded my brushes and stopped using cheapo paints my work has improved. Please understand by no means are your tools magic “PF Flyers” but they will assist you in the quest for improvement.

5. Cheat

Painting is all about the art of illusion. If you find a shortcut, a rule to break, or technique that gives you a better illusion then do it. By no means are any set of pointers or advice meant to be hard fast rules. This is your hobby, so in the end it is up to you to define how to best approach it.
Continue Reading...

Monday, January 21, 2008

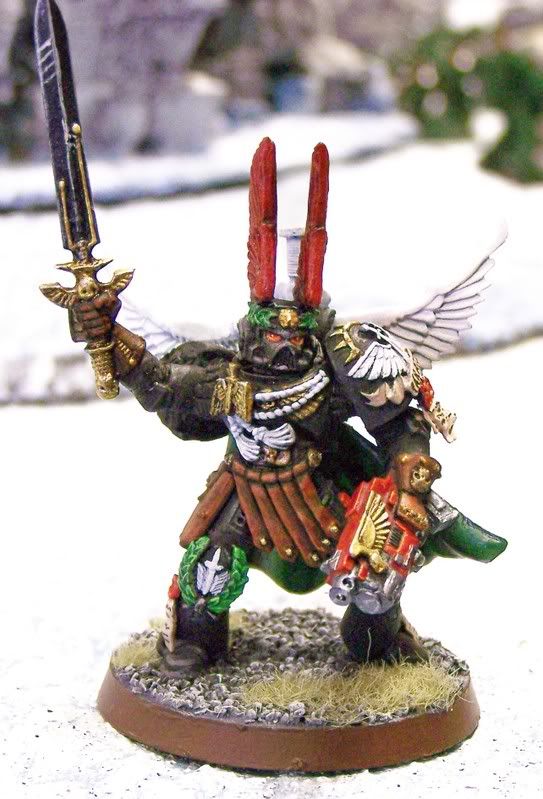
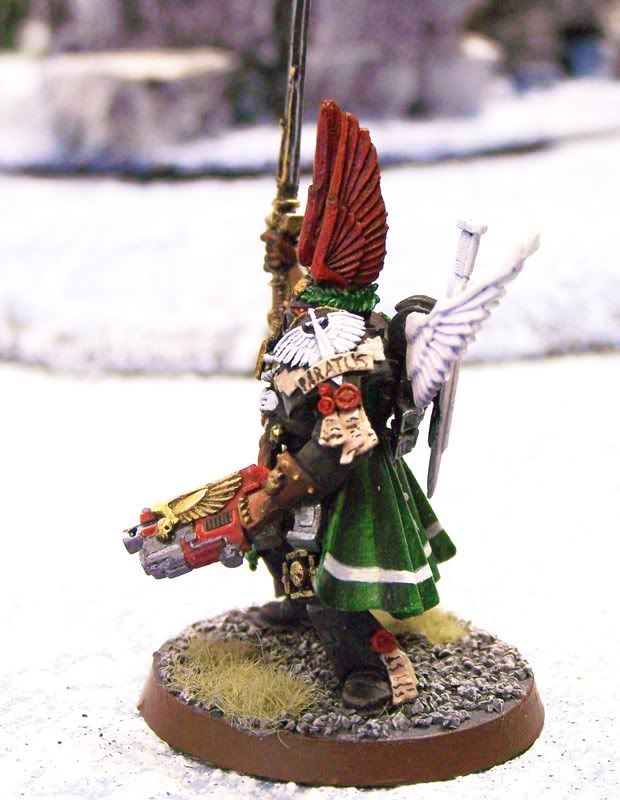
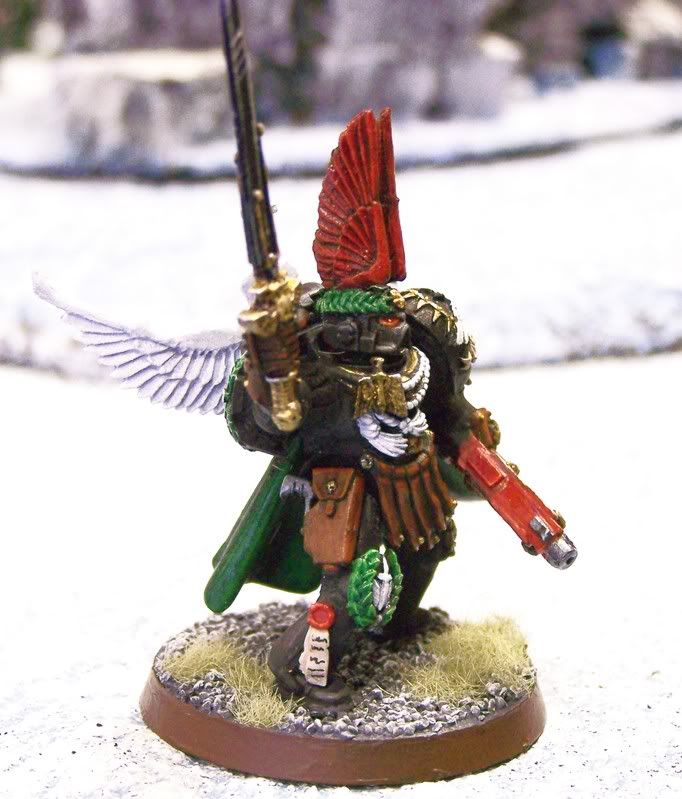
Finished Pre Heresy DA Commander

Well ladies and gents I have completed a comissione piece that is now all made of awesom and win. So without further ado, or guilding the lily:

Crosposted at Adeptus Astragalactica

Continue Reading...

Monday, June 11, 2007

Review: Foundation Series Paints


Before I invest whole hog in new paint lines, I like to check out a few of the paint line’s colors. I do this to this to see if the new paint is going to be worth investing in. Well I spent a cozy evening with two colors in the Foundation Paint Series by Games Workshop and here are my thoughts.

Because I play Dark Angels I decided to pick up Mechrite Red and Orchide Shade. The main thrust of my experiment was to see exactly the type of coverage I could expect, paint thickness, and to test the rumored drying speed

Coverage
Wow! The descriptions in the “White Dwarf” were not kidding. This stuff can cover black like no other’s business. I didn’t paint the stuff directly on the model from the paint pot. I transferred paint to my palette, and then thinned it with my “gunk” mixture. (Gunk is a mixture of water, flow improver, and slow dry additives. For more info on “gunk” go here.) This thinned mixture went on well. The nice part about the thinned paint is that it took fewer coats to obtain coverage.

Normally it takes 6 to 8 coats of almost any color to obtain coverage over a black primer coat. With the Foundation Series Paints it took two thin coats to obtain coverage. (I would like to emphasize that when I said thin I meant it. I thinned the paint 1 part paint, to 1 part gunk mix, and 1 part water.) When it comes to coverage this paint does the trick.

Paint Thickness
This paint is about as thick as standard GW paint. If you use a lot of GW paint you will understand the maxim of the Heavy Metal Team: Always thin your paint. The Heavy Metal Team has this maxim because GW paints tend to be a little thicker than the Vallejo or the Reaper Master Series paints. An experienced painter will thin any paint that they use to some degree.

If a painter doesn’t thin the Foundation Series Paints the results they will obtain are atrocious. The best way to describe it is leaving a paint pot open for an hour and then painting from that pot without thinning the paint at all. If the painter paints over details they may as well start over because this paint will appear to fill details in like putty. I think that this effect is also heightened by this paint’s opacity

Drying Speed
Straight out of the pot this paint dries almost as fast as rubbing alcohol. This has some advantages and disadvantages. The advantage is that is if you are trying to turn out a fully painted army as fast as you can then this paint is the way to go. Foundation Series Paints are perfect for assembly line painting. This is because by the time you reach the end of your assembly line the first model will be dry and ready for the next color.

This fast drying can be a disadvantage. When it is thinned with anything, it is terribly difficult to blend, and needs to be manipulated almost as soon as it is painted. During my session an example of this was experienced while painting an arm. I started at the shoulder and moved my way towards the hand. By the time I had finished the hand the shoulder was already dry. This occurred in the space of less than a minute.

Overall Opinion
Using the Movie Critics star system, I will rate this with paint brushes in lieu of stars. So out of five paint brushes I give this 2 1/2 paint brushes.

I’m giving it this rating because Foundation Paints are a great tool for the intermediate to advanced painter. It allows these painters to paint a nice saturated base color from which to work up from. The experience I had with the paint was that it was great for laying down my base color tones. It worked well for painting red over black, and for painting an eve shade of green. I wasn’t inclined to use it any further than that. As soon as I had the base color I was looking for I immediately switched over to my GW and Reaper Master Series paints because of the vibrancy, flow, and workability of these colors.

I would recommend giving them a try. Try them in a color that you use often and are familiar with. I would not recommend sinking $45 on them unless you are absolutely sure you know you will want and use them.
Continue Reading...

Monday, March 19, 2007


Well here is one of many images of Reaper's Dire Drake Kaladrax.
Painting:
Primer Coat: Krylon Black Primer
I then used multiple coats of drybrushing. The Skelatal parts were drybrushed about 6 times with GW Scorched Earth. Then drybrushed about four times with GW Graveyard Earth. I then drybrushed 3 coats of GW Bleached Bone, and then hit it with one drybrushed coat of GW Skull White.
The horns and claws were drybrushed with two coats of GW Shadow Grey. The fleshy parts of the wings were drybrushed 6 times with GW Scorched Earth. Then drybrushed 3 times with GW Dark Flesh, and 3 times with GW Vermin Fur. The base (not shown) was drybrushed in succesive layers of GW Codex Gray adding white. He took about 30 hours grand total including sanding, puttying, and painting.
Continue Reading...

Paint Stripping

Paint stripping models: This is for all those here in America Who don't have a DIY near them

Tools needed: Simple Green, Paint Stripping Brush, Old Tooth Brush, small plastic Foldgers can with lid

Shopping for tools: At the Home Depot near me in Aus, TX the paint stripping brush and Simple Green are on the same aisle (which was also on the same aisle as the varnish). Paint stripping brushes have a white handle and red nylon bristles keep asking until you find someone who can lead you to it. (I had to ask 10 people before I found someone who actually knew what I was talking about.)

Use: Drop Minis in coffee can, cover with undiluted simple green, put the lid on, leave in garage, or other out the way location. (I wouldn't leave it in your house cause it will make girlfriend/ wife/ S.O. fairly uptight after the third day of smelling sassafras) I let this concotion steep for 5 to 7 days for maximum effect. Using your paint stripping brush scrub your model until clean. I would use the tooth brush on plastic minis because the paint stripping brush has a light sandinig effect on plastics you may not want.
Continue Reading...
 

Tactical Rock Copyright © 2009 WoodMag is Designed by Ipietoon for Free Blogger Template