After some feedback on the Thunderbolt WIP I thought that it would be useful to reveal some of my sheet styrene techniques. I teach better through showing rather than writing, so if this is too confusing please contact me and we can get together here in Austin and I will show off these secrets.
With any scratch building project you will always need plans and/ or scale patterns from which you will base your project. As I said in my WIP article I found the pattern for the Thunderbolt on the Table Top War website. However in time I will become more adventurous and turn out a Warlord Titan with plans, but until then I’m going to stick with the project at hand. For this entire project I used Evergreen sheet styrene products. Evergreen sheet styrene can be picked up at any Hobby Town, or your local hobby store. (If you live in Austin, TX try Kings Hobby.)
With any sheet styrene project always use plastic cement. It will give you a better bond and results. I have, in the past, used Zap-A-Gap on sheet styrene and have been severely disappointed. I suggest using Testors Model Master Cement, or LiquaWeld. Both are fine products that basically weld your plastic pieces together.
What helped the Thunderbolt turn out as well as it did was the most basic angle in any construction project: 90°. What I did was print the pattern out in paper and test fit the entire pattern. Since paper is cheap and easy to work with it gave me a good idea where I would find all of the areas where two sheets, or a fold, would make 90°.
Here is why: Once you have made a three sided box structure all of your other joins to that box will be made easier. On the Thunderbolt’s nose section I joined the 90° joints first which made all of the other joints fall in line. Also it is much easier to join squared up objects with each other than trying to fit individual sheets together
Since this pattern was originally designed as a card stock “tape and fold” project I utilized a thinner stock of sheet styrene so that I would have very little adjustments to make in the pattern. The thicker you go with sheet styrene the more adjustments you will have to make. For example the vertical stabilizer, wings, and elevators use a thicker stock of styrene than the rest of the aircraft. But since they were static pieces I could use a thicker sheet without affecting the overall pattern or build.
As for the “how to make 90°” I will explain with illustrations.
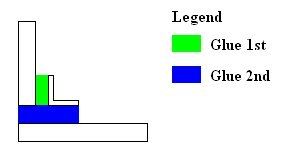 Our first illustration, I think, shows it fairly simply. If we were to use an Evergreen “L” bend strip we are able to quickly and easily obtain the desired 90°. First what you would do is glue the L bend with the side that will be mounting flush with the second sheet. After about a minute or so, when you glue has basically set, apply glue to your L Bend and sheet and mount flush with your other sheet. Now this isn’t the technique I used because I needed some rigidity to the joints, which gives us illustration two.
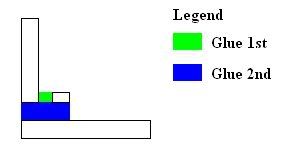
Illustration 2 and 3 is how I made the joins between the sheets. I used the machined edges of a rectangular rod to create my 90° joins. After that I clipped the lengths I needed with my handy spru cutter, and then I followed the steps for gluing like with Illustration 1.
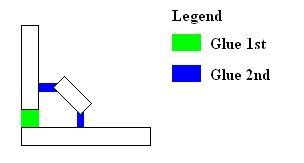 Illustration 3 is how I made the tail section. The tail section had very few 90° joins so I scored the plastic lightly, enough that it would bend then I set the angle and then glued the piece to straddle the joint. Illustration 3 shows glue in the joint, which I had to do when the plastic bend would break. It did twice for me so you will find you will need to glue the join. With the technique you also need to be incredibly careful not to use too much glue because if there is too much glue in the empty space the drying glue will draw the thinned sheet plastic toward the structural member.
Ok well that does it for now. If you have any other questions post them here and I will try and answer them.


0 comments: